My Mom’s Black Bean Salad!

Imagine that it’s July in Connecticut (or Martha’s Vineyard…where my sister and I like to go in the summer).

Summer...

Sundresses, sunglasses, boat shoes and flip flops, and sailboats.  Parties are frequent, and that bbq sitting on your backyard deck is fired up often.  What kinds of food do you imagine?  Grilled chicken, vegetable kabobs, hamburgers, potato salad and tortilla chips?  Me?  I think of my moms colorful and delicious black bean salad.  Its best cold, crunchy and cooling, piled high your plate next to some chips, and your choice of bbq.  Now, when the Food and Culture project was introduced, I didn’t immediately think of Black Bean Salad.  I thought of plenty of other yummy things, but this past weekend I made my moms roasted corn, ripe tomatoes, and feta cheese salad…and it was all I could think of.  I couldn’t believe that I hadn’t remembered it before!  I wrote a post-it to remind myself of my brilliant but late idea and stuck it on the bottom of the grocery list I had hung on my fridge.

Fast-forward to Sunday afternoon.  I’m standing outside Lucky Grocery Store trying desperately to get cell phone service so that I can call my mother quickly to make sure I have all the right ingredients.  She told me I needed green onions (those long green string-y ones) not white onions and plenty of limes.  The conversation was quick and to the point. Just the way I like conversations with my mother….short and sweet.  Don’t get me wrong, I love my mother dearly.  We just don’t see eye to eye on most of the things that go on in my life…so it’s just easier to keep phone conversations quick, with a clear objective in mind or else I always seem to get into trouble over something.  But none the less, I got all the right ingredients and lugged all 6 bags of groceries back up the hill with my roommates.

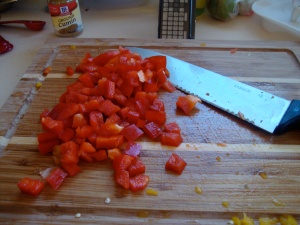
Now its Monday night, after a day of studying, homework and sitting in the media editing suites for audio I came home to make black bean salad.  Honestly, I wasn’t very excited.  I just wanted to watch my Uconn Men…(NATIONAL CHAMPS) but instead they were on in the background while I was chopping…and chopping…and chopping.  Definitely not as much as Matt had to for that amazing pico de gallo…but still I had enough of knives and cutting boards by the time I was done. Now…to start with the ingredients that are needed…

  • 2T Olive Oil
  • 2T Lime Juice (or more to your taste…I tend to like more!)
  • 1t Cumin
  • Salt and Pepper to your taste
  • 1 Can Black Beans (I used Progresso brand…to make this bigger batch I used 2 whole cans)
  • 1 Can corn (Fresh corn is better…but none of it was fresh at Lucky unfortunately.)
  • 1 Green, 1 Red, and 1 Yellow Bell Peppers
  • 2 Green Onions

Now…I didn’t call my mom for the instructions.  I sent her a text message asking her to EMAIL me the right measurements for everything.  But that didn’t happen.  Perfect example of our semi-dysfunctional relationship…neither of us listens to the other!

I got this instead:

Instructions on my totally uncool phone.

My mom and I have decided (well…more like me) that text messaging is more efficient when I need something, and don’t want to be bothered with incessant questions on my current internship search/bank statements etc. I can only get what she can fit into a text message…and if it can’t fit…it can’t be sent.  And if it is sent I then can choose to ignore!  Oh well…I love her dearly and we do get along most of the time.  Just at the moment its a little–tense.

Now…for instructions.


  • Put the 2T olive oil, 2T lime juice, 1t cumin, and salt and pepper into a large bowl.

Oil...


This adds some spice/flavor


All wisked up!


  • Drain and rinse the 2 cans of black beans, and the 1 can of corn.

Black beans...and sadly canned corn. Fresh is better

Putting it all together


  • Dice and put 1 green, 1 red, and 1 yellow pepper into the bowl with corn and black beans.

Green, Red, Yellow...

I had 3 pix of this all in different colors...you get the idea


  • Mince two green onions

This is what green onions look like...long, green, and skinny


  • Now…mix it all together, making sure all the veggies get coated with the yummy cumin/limey mix.  Add more lime or cumin to appeal to your taste!

All mixed together and lookin delish!


Now… you’re all done and have something healthy and summer-y to bring to your next bbq or summer party!  Enjoy!

White House Nuclear Policy Analyst to Food Network Star?

I ate her Potatoes au Gratin before I watched her on the Food Network.  They were a Christmas Eve and Easter dinner staple in the Lauer household, and shared with any friends my family shared those meals with.  (Which was a lot because most of our family lived out of state.) These potatoes are the richest, cheesiest, best addition to your holiday   table EVER.  I wish I had a picture of these glorious things, but you will just have to trust me and go find one of her cookbooks…I’m pretty sure the recipe is in the “Barefoot Contessa” cookbook.

Just Google-ing Ina Garten led to multiple surprises.  The first?  She grew up in Stamford, CT…not too far from where I grew up in Madison!  The 2nd?  She has her pilots license…which she achieved BEFORE she earned success on The Food Network!  The most surprising and impressive non-food fact about Ina Garten is the fact that she climbed her way up from a low-level White House aide job to the position of Budget Analyst, where she wrote nuclear energy budget and policy papers, on nuclear energy plants for President Gerald Ford and President Jimmy Carter.

Ms. Garten and her husband took a 4 month camping trip to Paris, France after her husband finished his military service, and she Ms. Garten says this trip was the start of her love for French cuisine.  When she got back to the States, she started to study “Mastering the Art of French Cooking” by none other than Julia Child.  Studying the cook book written by Julia Child led to her weekly dinner parties.

Ina Garten has no formal culinary training, she was taught by French and New England cookbooks.  Ms. Garten’s culinary career began with a gourmet store named Barefoot Contessa, when then was expanded to best-selling cookbooks, magazine columns, name brand products, and finally a very popular Food Network show.  Now she relies on feedback from her fans and audience to make sure her recipes are just perfect.  –Which they are.

After Ina Garten’s cookbooks gained huge success, she was approached by the Food Network, who wanted Ina to have her own television show.  She turned down the offer many times until the right production company and the right offer was finally given to her.  So, in 2002 Ina Garten signed a deal to a 13 show season.  Her show is focused on filling, guest friendly food, as she is known for her dinner parties.  The press has often compared her to Martha Stewart but they say that she ” has a softer edge and and a more nurturing and  comforting manner.”

Above is Ina Garten’s Food Network show.  As you can see… she is a very sweet woman, who definitely still has her “dinner parties.”  This is my FAVORITE cupcake recipe…it is really easy.  However, I have never been able to find those candied violets!  I love Ina Garten and her show Barefoot Contessa.  Just her personality, demeanor, and her pretty, welcoming smile makes me want to hang out in her kitchen, watch her cook, learn her tricks, and of course eat everything that comes out of her oven or off her stove.  I think Ina Garten does a very good job at telling her audience just how much of every ingredient goes into each recipe.  I think the video above is a very good example of that.  She may do it fast, but it is easy enough to see exactly how much flour for example, she puts in her chocolate cupcakes.  She isn’t like a lot of her Food Network counterparts who aren’t seen measuring their ingredients.  I have no idea how anyone could eyeball 1/2 teaspoon, or a cup.


Hello! and Green Media 5 Course Lunch Project!

First blog post!  Yay!  This is really cool and super easy! I figure I should introduce myself to the internet world huh?  I’m Liz, a junior at the University of San Francisco studying Media!  This blog is partly an ongoing project for a class (Green Media) and partly an interest I’ve had for a little while now.  I am currently sitting alone in my apartment, at my kitchen table, listening to music, very much procrastinating.  I have a project due tomorrow for Green Media.  A delicious project, and one that I’m looking forward to eating tomorrow, but I still haven’t started yet.  The project is the “Lunch Project”.  I picked the Entree portion, while other classmates chose from Appetizers, Soups, Salads, Entrees, and Desserts.  I decided to make risotto parmesan. My mother always used to make risotto at home, it is a delicious and rich Italian rice made with Arborio rice, chicken stock, and my favorite ingredient LOTS and LOTS of parm cheese.  I think cheese makes everything taste better.  Now, I don’t have an exact recipe for this because my mother and I usually do it to taste, but I will add a recipe that I will try to follow, and if I alter the recipe while cooking I will note of the changes!  Now.  Here are a few tools that you will need.

  1. A medium sized pot.
  2. A cheese grater.
  3. An electric chopper (for the onions if you, like me have sensitive eyes, also helps with the garlic too though!)
  4. Measuring cups.

Here are the ingredients for a basic risotto.

All prepared and taken out from my cabinet! (My roomie--seen in a later pic-- LOVES risotto. So we always have it!)

  1. 2 tablespoons virgin olive oil.
  2. 1/2 an onion
  3. One clove of garlic
  4. 2 cups Arborio Rice
  5. 8 cups low sodium chicken broth (heated…I just heat it in the microwave for about two minutes in my pyrex measuring cup.)
  6. 1/2 cup of parmesan cheese (more or less depending on your love of everything cheesy…I usually opt for more and taste test.)

Now…the instructions!

–First, coat the bottom of a medium sized saucepan with 2 tablespoons olive oil.
–Second, sautee the 1/2 onion (chopped) and the one clove of garlic (minced).

I use a electronic chopper to chop onions, because my eyes ALWAYS really hurt if I try to chop them by hand. Plus this mini-chopper makes it easier!

–Then add the Arborio rice to the pan, stirring quickly until it is well coated with the olive oil and is opaque looking.

This is basically what the risotto looks like when you can start putting the heated chicken stock in.

**This part cooks the starch-y coating on the rice and prevents it all from sticking together…trust me…I Googled it.
–Now, add a cup of the heated chicken broth stirring until all the broth has been absorbed by the rice.

Add the heated chicken stock one cup at a time, waiting for the rice to absorb it before putting the next cup in!


–Add the remaining 7 cups of chicken broth one cup at a time, continuing to cook and stir allowing the rice to absorb each addition of the broth before adding more.

This is the hard part. Stir and stir and stir until each cup of chicken stock has been absorbed by the rice.

**The risotto should be slightly firm, and creamy, not at all mushy.
–Once the rice has absorbed all the broth, add the 1/2 cup (or more!) parmesan cheese, stir, and cook briefly until melted.

Now, I’ve always had people ask me why I just don’t make that instant risotto stuff.  Truthfully? I’ve never even tried it.  Yes, risotto takes a lot of stirring and standing over the stove (but hey! It keeps your arm muscles tight!) but it is soooooooooooo worth it.  Risotto goes with almost anything.  I’ve put shrimp, mushrooms, chicken, asparagus, and  broccoli in it!  It also is a good side dish when cooking salmon.

Leftover risotto is delish too!  Just heat it up in the microwave and you have another meal!  Or…my personal favorite is throwing it in a pan with some olive oil and frying it to get the outside nice and crispy and the inside nice and creamy and melty!
For more pictures and visual instructions please visit my Flickr page here.